Showing posts with label easy baking. Show all posts

Thursday, March 6, 2014

Easy Andes Mint Brownies


Whenever I watch food TV shows I frequently hear chefs say that they have made an elevated version of a classic dish. I find this pretentious and wonderful at the same time. For example, to say that you can "elevate" an already perfect dish such as mac n' cheese may seems ludicrous. Who do you think you are? But when you add bacon and breading or have the audacity to deep fry it (yum) then you're absolutely right in saying it has been elevated. Perfection has been perfected.

Where does the brownie fit in in all of this? Ladies and gentelemen, the box brownie has been elevated. Actually, elevated may be taking it a bit too far. Stepped up? Mildly improved upon? Anyhow, it's been varied and it's absolutely delicious. I have never been one to look down upon a box dessert (because they're great) but this is a refreshing change and quite tasty. One of my college roommates used to do this in the BYU days and I thought she was genius. (She actually was a genius, but not just because of the brownies.)

So next time you're snatching that boxed brownie mix at the store, grab some Andes mints too. They're just the ticket to elevating an already delicious classic. 

Easy Andes Mint Brownies

Note: Although this recipe is extremely simple to make, it does take a good amount of time for the chocolate to harden on top. So don't attempt to make them last minute if you are in need of a quick dessert! They require an hour or so of refrigeration.

Ingredients:

Favorite brownie mix (and ingredients required on the box)
Andes mints - about 20-25

Recipe:

1. Make brownies according to directions on package.
2. As soon as brownies come out of the oven, immediately place mints on top of the hot brownies as shown below and let melt for about 5-10 minutes.
  3. Spread the chocolate while still soft and melty to form a nice even layer on top of the brownies. Place in fridge to cool for an hour or until set.

That's it! It's that easy! And soooo tasty.


Follow my blog with Bloglovin

Friday, February 28, 2014

Funfetti Pudding Cookies


I have a lot of things in common with kids. The lives of kids involve a lot of "treats and snoozin', snoozin' and treats" as my sister likes to say. I also aspire to snoozin' and treats (and I bet you do too). We are one.

This particular treat is extremely kid friendly. Besides that it's easy to make, it tastes like something a kid (and a honest human) would love. Key ingredients are pudding and sprinkles. Need I say more?

Make them, eat them, be a kid and take a nap. Goodnight!

Recipe source: barely adapted from Crazy for Crust

Funfetti Pudding Cookies

Ingredients:

1 stick butter, softened
1 cup white sugar
1 egg
1 teaspoon vanilla extract
1/4 teaspoon salt
1 1/2 teaspoons baking soda
1 small box (3.4 ounces) instant vanilla pudding mix
1 & 1/2 cups flour
Sprinkles

Directions:

1. Preheat oven to 350 degrees.
2. Beat together butter and sugar until nice and fluffy. Add egg and vanilla and beat in.
3. Combine dry ingredients (I actually rarely do this, but I know it's a good idea :) Slowly add to wet ingredients and mix in until fully incorporated.
4. Stir in whatever sprinkles your heart desires.
5. Roll into small 1" balls or use a mini ice cream scoop and place dough on trays.
6. Bake for 7-8 minutes. Allow to cool on cookie sheets.
7. Share with your favorite little.  


Friday, September 6, 2013

White Chocolate Twix Popcorn


Raindrops on roses and whiskers on kittens - these are a few of Julie Andrews favorite things. I cannot deny that they are delightful but as far as edible, they are not. If you had to list a few of your favorite sweet favorite things, what would that list include? Mine would include, chocolate - check. Caramel - check. Twix - check (my favorite candy bar!). I have recently discovered that popcorn is the perfect canvas to just dump a bunch of these favorites into. You really can't go wrong. It is a forgiveable and delicious canvas! As if popcorn wasn't already delicious enough, now it is positively devilish. This version was created when a sweet friend brought me a bunch of Twix bars because she knows they are my favorite and because I am pregnant and decidedly not on a diet, only a hunger rampage. I thought it would be fun to repurpose the Twix ("Chopped", anyone?) and this is what I came up with: popcorn that is first blanketed with white chocolate (naturally) and then drizzled with milk chocolate and caramel sauce. Twix are mixed throughout to give it that little extra crunch. And there you have it! Now you can jazz up your movie and popcorn date night. Yummmmm-yum.

White Chocolate Twix Popcorn

1 bag popped popcorn
1 cup white chocolate chips
3-4 TBLS shortening
About 8 fun size Twix, roughly chopped
1/4 cup chocolate chips
1/4 cup caramel sauce - you could use storebought or I used this homemade version from Ree Drummond: http://www.foodnetwork.com/recipes/ree-drummond/easy-caramel-sauce-recipe/index.html - it was easy and I had all the ingredients on hand

1. Microwave popcorn according to package directions. When done, let cool for a minute before scooping out with hands into large bowl. It is better to scoop out than to pour so that you don't get all those pesky kernals at the bottom of the bag.
2. Microwave white chocolate chips on 30 second intervals until melted. Stir in just enough shortening to thin it out until it is pourable. Pour over popcorn and toss with two spoons. Add Twix and mix together. Spread onto wax paper to dry.
3. Meanwhile, melt chocolate chips in microve in 20-30 second intervals until melted. Drizzle over popcorn. If you find that the chocolate is too thick to drizzle, you can use milk to thin it out. Also, you can definitely use more than 1/4 cup chocolate if you prefer - whatever ratio you favor. 
4. Drizzle with warmed caramel, either homemade or from a jar.
5. Let everything sit for at least 30 minutes or until firm, then dig in!


Thursday, July 25, 2013

Easy Butterfinger Brownie Trifles


So I have had a lot of food failures in the kitchen lately. Yikes. The good news is my kitchen cabinets have recently been repainted white and now my kitchen is beautiful and refreshing like a piece of spearmint gum, so I really like spending time in there.

My most recent mishap was a pot of would be pomegranate jam that I slaved over a hot kitchen stove for over an hour tending to, only to find that it turns out I don't really know how to make jam and also my 16 month old chooses the most inopportune times to start wailing from his crib to come let him out after his nap. Long story short, my "jam" turned into a burnt jar of molten rock that could've passed for something you'd find on a volcano site. Not. Edible.

This, amongst many other blunders, made me crave something easy, fast, delicious, FOOL-PROOF. And here you have it. My husband thought it was delicious, but also thought it was funny that it even needed a written recipe. That's the thing. It really doesn't. It's just brownies and pudding and butterfingers and a whole lot of yum. I even used store bought brownies to avoid having to turn on the oven again and also to avoid the risk of messing those up as well :) Enjoy!

Easy Butterfinger Brownie Trifle

1 pan of cooked brownies
1 package instant Vanilla pudding (3.4 ounce)
2 cups milk
10-12 Fun size Butterfinger candy bars
Whipping cream, for topping

1. Make pudding according to package directions using 2 cups milk.
2. Place Butterfinger candy bars in plastic ziplock back and crush into fine crumbs using hands or rolling pin.
3. Mix Butterfinger crumbs and vanilla pudding together.
4. Layer brownies and pudding in individual serving cups or in large trifle dish.
5. Top with whipping cream and reserved candy bar crumbs.


Friday, June 21, 2013

No-Bake Peanut Butter Bars


It's summertime and we're feeling fine! Although we are melting. Is anybody else melting?? It is just so hot! One can simply not be slaving away in a hot kitchen when the sun is beating down all around you. But you also don't want to go too long without a treat. The solution? No. Bake. Peanut Butter Bars. They are easy, fast, and oh so delicious. They are perfect for a potluck or BBQ. I recommend them chilled with a cold glass of milk. Bon Appetite!

No-Bake Peanut Butter Bars

1 cup salted butter (melted)
2 cups keebler graham cracker crumbs (yes, they come already in crumbs! no smashing required)
1/4 cup brown sugar
1 3/4 cups powdered sugar
1 cup creamy peanut butter
1/2 tsp. vanilla
1 (12 oz) bag milk chocolate chips

1. Combine melted butter, graham cracker crumbs, sugars, peanut butter and vanilla in bowl. Stir until well combined and creamy. 
2. Pour mixture into a 9 x 13 pan.
3. Melt chocolate chips in the microwave in 30 second increments, stirring each time until melted, about 1-2 minutes. Pour over peanut mixture and spread with a spatula.
4. Refrigerate at least one hour. Cut and enjoy!

Recipe slightly adapted from http://www.iheartnaptime.net/no-bake-bars/

Tuesday, May 21, 2013

No-Bake Chewy Granola Bars


I feel like this sort of recipe warrants the stamp of "mom approved." But saying that makes me feel really matronly so I will forego such usage. (If you use "mom approved" I'm sure you do it in only the most acceptable ways).

But the thing is - it is mom approved. As in - I am a mom and I feel very comfortable eating these delicious little bars under the category of 'snack' and not 'treat.' This means that I can also feed them to my little guy during snack time and not feel guilty about it. They have oats and rice krispies (an iron fortified cereal!) and therefore are basically little morsels of whole grain goodness with only the most moderate addition of brown sugar and honey. And anyway, I feel that anything homemade is good for you. Imagine a chewy granola bar from the store, injected with preservatives and other mystery ingredients. Now imagine making your own granola bars in a matter of minutes and you will feel oh so wholesome. See what I mean?

No-Bake Chewy Granola Bars

4 tablespoons butter
1/4 cup honey
1/4 cup packed light brown sugar
2 cups quick cooking oats (make sure they are actually quick cooking and not just rolled oats!)
1 cup rice krispies cereal
1/2 teaspoon vanilla
Chocolate chips or dried fruit for topping

1. Grease a 9x11 inch pan with cooking spray. I don't have a 9x11 so used a 9x13 and just packed the granola into a smaller portion of the pan, which worked great.
2. Combine butter, honey and brown sugar in medium a medium saucepan. Cook over medium heat until the butter melts and the mixture is slightly simmering, about 2 minutes. Stir constantly to prevent the butter from burning. Remove from heat and stir in the vanilla.
3. Add the oats and rice krispies and stir until combined. 
4. Press the mixture into the pan and press down very firmly to ensure that the bars don't crumble. Sprinkle the chocolate chips or fruit on top. 
5. Let the bars cool for 2 hours at room temperature or about 30 minutes in the fridge. Cut into rectangles.

Yum!

Recipe source: melskitchencafe.com via Rachel Ray


Thursday, February 28, 2013

Nutella-Stuffed Funfetti Cookies


Aaaaaaand, we're back!

The fam and I bought a house! So we've recently moved: packed, unpacked, vacuumed, un-vacuumed, found things, lost things, etc. and moved five minutes across town. It's a great little house with a great little yard. I have always wanted a lemon tree and now I have three lemon trees, which begs the question - what the heck do you need three lemon trees for? But I can't wait to find out.

So. Nutella-Stuffed Funfetti Cookies. The name says it all. I discovered them on http://notyourmommascookie.com/ (which is an amazing blog) and knew that I must partake. I got settled into my new kitchen, reacquainted with my Kitchen-Aid and got down to baking business. These are pretty simple cookies, though, so the baking was quick! Make them today. They are as good as they sound.

Nutella-Stuffed Funfetti Cookies

1 box Pillsbury Funfetti cake mix
2 eggs
1/3 cup vegetable oil
1 tsp. vanilla extract
Approx. 1/2 cup Nutella

1. Preheat oven to 350 degrees.
2.  Line a cookie sheet with parchment paper. Scoop teaspoon size balls of Nutella onto cookie sheet. Freeze for about 20 minutes or until firm.
3. In a mixing bowl, mix together the cake mix, eggs, vegetable oil and vanilla extract until combined.
4. Take a heaping spoonful of dough and press a frozen Nutella ball into the center. Form the dough around the Nutella to form a ball and roll until it is smooth and no Nutella is exposed.
5. Bake for 9-10 minutes. Allow to cool on cookie sheet.

Delish!

Thursday, August 23, 2012

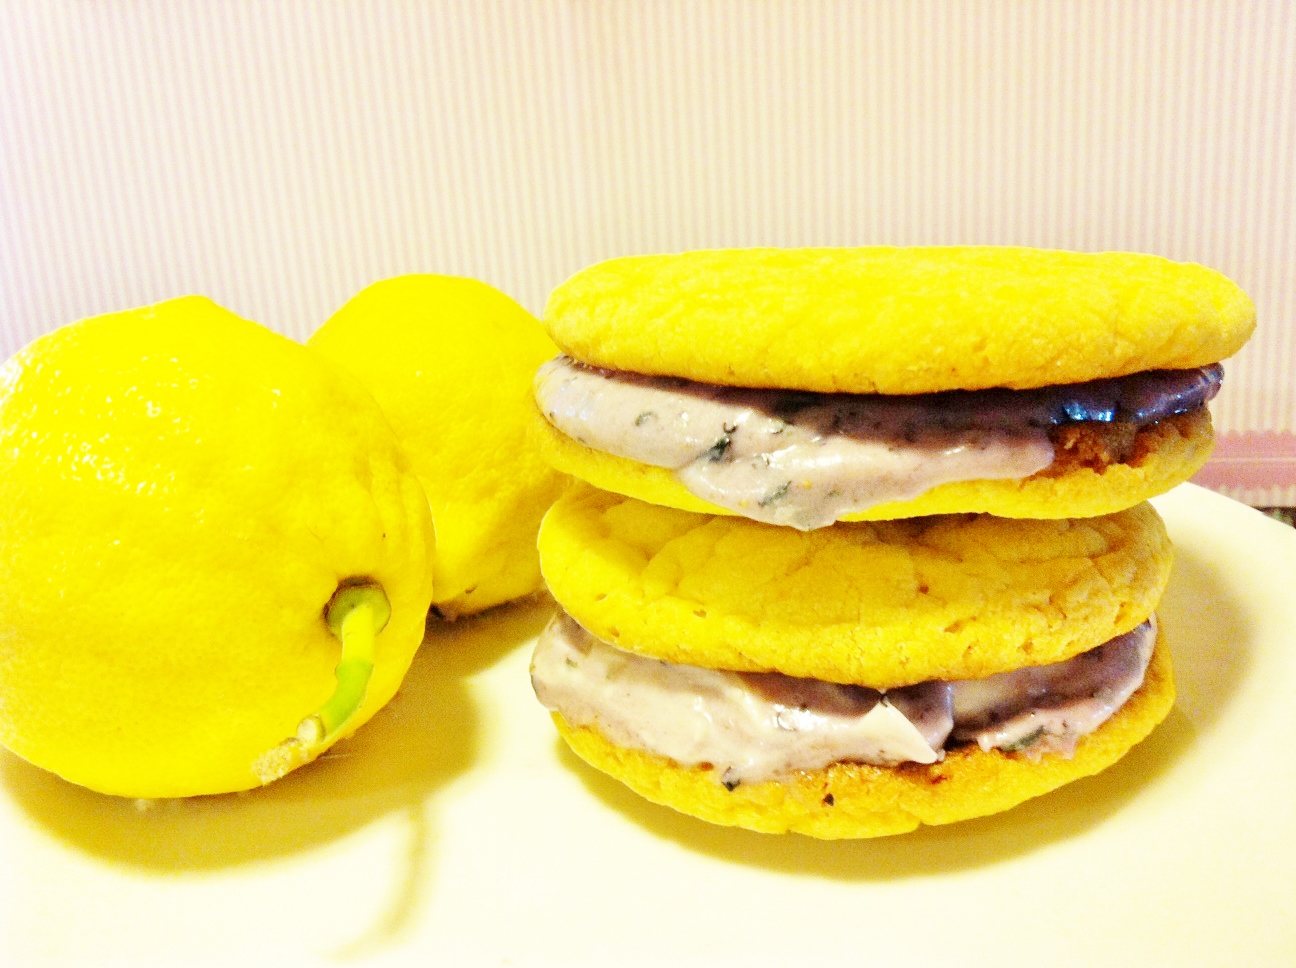
Lemon Blueberry Sandwiches - 5 Ingredients

My sister recently reminded me of the joys of cookies made from a cake mix. My, my - what a pleasant reminder. Cake box cookies require virtually no work and yield chewy yummy goodness. I revisited them this summer with a little addition of my own to make a sugary sandwich where nothing is wrong, everything is right.


Here are your five ingredients:


Lemon cake mix
2 eggs
1/2 cup vegetable oil
Vanilla frosting
Blueberries (You could easily substitute any berry; everything goes with lemon)

Mix together cake mix, eggs and vegetable oil to form dough. Drop onto cookie sheet in spoonfuls and bake at 350 degrees for 8-10 minutes. Let cool completely before frosting.

Puree about 1 cup berries in blender. Fold puree into frosting. Spread onto cookies to make a little summer sandwich. 

Voila. 
Related Posts Plugin for WordPress, Blogger...
 
site design by designer blogs